Garrattfan's Modelrailroading Pages
AD60
4.3 Detailing the boiler cradle assembly (3)
|
Instructions [294] to [325], page 25-27 of the rewritten instruction manual
After all the fun on the left side I continued working on the right side |
|
 |
First job at hand was adding the piping to the large pump on the smokebox's side.
A pipe runs through the footplate and a return pipe or something similar between the upper and lower part of the pump. |
 |
Oh, did I mention that DJH tends to forget to tell where and when you need to drill holes? I did, didn't I? Well I missed out on this one. One of tiniest valves on the entire boiler, and I forget to drill an extra hole. I tied the entire boiler cradle on my crosstable and thankfully I could just get to the valve with my drill |
 |
To drill the tiniest of holes (yellow arrow).
While studying my camera after having taken the photo I noticed that working on this valve I had loosened up the newly soldered pipe from the pump to the air filter. That of course was quickly restored. Speaking of which, this pipe is not easy to bend. It's 0.7 mm thick and ends in a 180 degree turn |

Once the hole was drilled in the tiny valve the handrail was put in place and the control pipe to the upper part of the air pump bent and soldered |
|
 |
What is more difficult than bending a tube? Bending two tubes! This pair needs to be absolutely parallel which proved to be a very accurate job.
It's not a perfect but I think it is good enough
|
 |
See? |

Impressive isn't it?
|
|
 |
Adding the fresh steam tube to the generator required drilling yet another hole I overlooked when mounting the genny itself. Thankfully I could still get to it with my drill. Note how tight tolerances are. Do not drill too deep otherwise the top of the genny will come off. |
 |
After adding the tubes to and from the generator. These tubes are not easy to bend. They need to follow the contour of the boiler within tenths of mm and also need to run parallel to each other. It took me several tries before I achieved this result. Here again apply the rule: if you're not happy, better start all over. |
Next the fat tube to the steam turret was added. (yellow arrow) |
|
A detail of the small piping below the footplate. |
|
 |
|
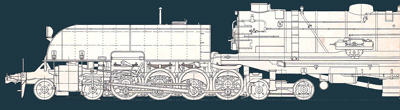
An atmospheric impression of my workplace with the AD60 simmering in the early morning sun (19 May 2013)
|
|

A re-bent tube to the steam turret |

The original routing of the tube |
I found that the fat tubes to the steam turret obstructed the forward view of the crew. Taking a close look at some photos of the prototype I saw that the tubes bent inward. So I took those tubes off again and reformed them to a better fit. As these tubes are 1.0 mm thick they are hard to bend so I annealed the brass first. |
|
After adding the injector and its pipe work |
|
Well we're getting somewhere |
|


Sign my
GuestBook